Enter payroll data using the Employee Timesheet page
The Employee Timesheet page is where you can enter specific hours or earnings for an employee in a pay period. The Employee Timesheet page contains more options to customize an employee’s payment than are available on the Rapid Entry page.
Use the Employee Timesheet page (or Employee Timesheet – Second Payment page) to do the following actions:
-
Enter exceptions such as overriding a salaried employee's normal payments.
Note: On a regular run, salaried employees are paid automatically, so you do not have to enter values for them unless you want to pay an additional amount over their regular salary.
- Pay out vacation pay
After you enter data on an employee’s Employee Timesheet page (or Employee Timesheet – Second Payment page), that employee’s hours and earnings fields are no longer editable on the Rapid Entry page. On the Rapid Entry page, fields that have been edited in the Employee Timesheet display the text Timesheet.
Video
How to enter hours and earnings for one employee at a time
Tasks
Regular Payment
 Enter hours and earnings on the Employee Timesheet for a regular payment
-
Navigate to the Employee Timesheet page.
Tip: Complete any Rapid Entry information before moving to the Employee Timesheet. Entries made on the Employee Timesheet cannot be edited on the Rapid Entry page.
- From the Employee List, select the employee for whom you need to enter regular payment data.
- If the period of time applicable for this payment is different from the time period already displayed, from the Applicable Period of Time list, select a period of time.
- If you are paying an employee for a pay period other than the current one, select the appropriate pay period from the For which pay period? list.
- Enter Hours, Earnings, or Vacation Accumulator amounts, as required.Note:
For hourly employees, approved time of requests are automatically populated to the Timesheet or Rapid Entry page. Enter any hours worked as usual.
For salaried employees, time off requests automatically offset the permanent salary amount.
- Click Save.
- Repeat for all employees for whom you want to make Employee Timesheet entries.
Note: If you require more rows to enter your data, click Save. Powerpay refreshes the page, displays all previously entered values and adds more lines.
View Daily Hours on the Employee Timesheet in Powerpay
Once the Manager or Payroll Admin approves the hours, they are available to view and edit on the Employee Timesheet in Powerpay.
-
Go to the Employee Timesheet page.
-
Select the Employee from the People list.
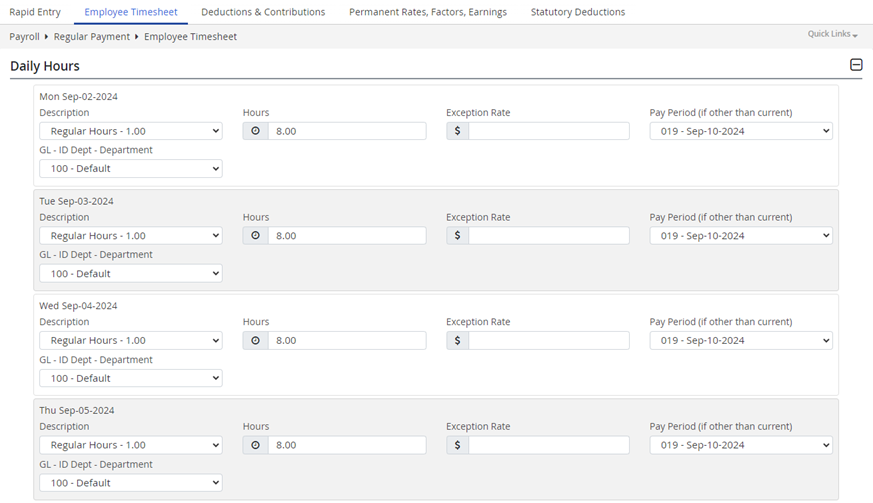
The Daily Hours section displays at the top of the timesheet with any hours entered in Self Service by the employee.
-
Review the hours submitted by the hourly employee.
-
Add Daily Hours on behalf of an employee or make any changes as required.
-
Click Save.
-
Updates made in Powerpay do not display in Self Service. This is to maintain the state of the employee’s timesheet in case you need to refer back to what was submitted by the employee or manager.
-
The Rapid Entry page.
displays a Timesheet link when Daily Hours are recorded for an employee. Click the Timesheet link to view the Daily Hours details. -
Daily Hours are also available on the Manual and Reversal pages and hours recorded for an employee display on the Data Verification page.
and the Payroll Preview page.
Second Payment
Enter hours and earnings on the Employee Timesheet for a second payment
-
Navigate to the Employee Timesheet - Second Payment page.
Tip: Complete any Rapid Entry information before moving to the Employee Timesheet – Second Payment. Entries made on the Employee Timesheet – Second Payment page cannot be edited on the Rapid Entry page.
-
From the Employee List, select the employee for whom you need to enter second payment data.
Tip: Default data entered on the Rapid Entry - Second Payment page appears on this page. You can edit this data, as required.
-
Enter all relevant information for the employee.
Note: The amount displayed in the Current amount in vacation pay accumulator field does not reflect earnings yet to be allocated for current pay period.
-
Confirm the Applicable Period of Time. If it is not correct, select the appropriate value from the list.
-
Enter Hours and Earnings information, as required.
Note: For Second Payments, any permanent salary or permanent earning types are not paid, therefore, it is not necessary to enter a "0" override amount.
-
Enter Salary Overrides in the Earnings section, if required.
-
Select the appropriate option from the Vacation Pay Accumulator list.
-
Enter Government Deductions, as required.
Note: Any additional permanent, permanent fixed amounts of tax or permanent percentages of tax set up for an employee on the employee’s Statutory Deductions page automatically apply to an employee’s Second Payment. If you do not want this to occur, consider entering a one-time tax override.
-
Enter Miscellaneous Deductions and Contributions, as required.
Note: Any permanent deductions and contributions are highlighted in red and apply to the Second Payment for this payroll run even if no amount is displayed. Any values entered in the amount field are processed as dollar amounts and override the permanent value. If off-cycle values (shown in black) are required, you must enter them if they are to apply to the selected employee’s Second Payment.
-
Enter Garnishment Deductions, as required.
-
The Direct Deposit Override section may be displayed, depending on the option selected on the Second Payment Options page and if the employee has enabled direct deposit information. If the option is set to be based on the employee-level selection, select the appropriate option.
Note: If the employee’s direct deposit information is disabled or not set up, this section indicates that the employee will receive a cheque for the Second Payment.
-
- Click Save.
- Repeat steps 2 to 4 for each applicable employee.
Note: If you require more rows to enter your data, click Save. Powerpay refreshes the page, displays all previously entered values and adds more lines.